Baking and stuff, Peachy Buns

Peachy Buns

Oooooh peaches! Beautiful peaches! I bought two packs, And the very next day, I wake up to see them turning to mush before my very eyes. I am determined not to throw them out!

I start flicking through my cookery books – peach salsa, chilli and peach jam, peach jam. They all sound delightful but require ingredients I don’t have and am not bothered to go to the shops to buy.

I’ll make buns. I know the flavour I want and work backwards from that. I wonder ‘Will they be too sweet?’ ‘Will they be too wet?’ Will they rise?’ I persevere and they turn out delicious.

I cooked some in paper bun cases and some in a traditional muffin tin. The ones in the paper cases rose beautifully, the ones in the tin not so much. They all tasted the same – yum!

Ingredients
3 soft peaches, peeled, cored and cut into small pieces
4 oz, soft unsalted butter
6 oz caster sugar
2 medium eggs, beaten
8 oz self-raising flour
1 tbsp cinnamon
½ tsp salt
4 tablespoons, almond flakes

Method
1. Preheat the oven to 180 C (Fan)
2. Set out 16 paper bun cases
3. Sift the flour, cinnamon and salt together
4. Cream the butter and sugar together until pale
5. Add in the beaten eggs until combined
6. Add in the peaches and nuts
7. Fold in the flour in three stages
8. Divide into the bun cases
9. Bake for 20 minutes in the middle of the oven
10. Test with a skewer to see if they are cooked through
11. Remove from tin and allow to cool on a wire rack

Advertisement
Standard
Baking and stuff, Caramel Slices

Decadent Caramel Slices

As traybakes go, this is not only one of the most decadent but also one of the most warmly received! I have made this so many times over the years and it has always put a great big smile on people’s faces!

Constructed in stages, it does take a little time but it is also very straightforward. I add in some semolina to the flour to make the base more crumbly. I have thought of substituting butter for the margarine but it could be a step too far!


Makes 12

Ingredients
Base
4 oz, soft margarine
2 oz, caster sugar
6 oz, plain flour (less 3 tablespoons)
3 tbsp, Semolina

Caramel
6 oz, condensed milk
2 tbsp, golden syrup
4 oz, butter
3 oz, caster sugar

Topping
6 oz, milk chocolate

Method
1. Heat the oven at 180C degree
2. Grease a baking tin (about 7 inches x 11 inches)
3. Cream the margarine and sugar
4. Add the flour and semolina and mix all ingredients together until fully combined (as if making pastry)
5. Press the shortbread mix into the baking tin and smooth over with the back of a spoon
6. Bake in the oven for 20 to 25 minutes until golden and then allow to cool
7. Combine all the caramel ingredients into a heavy saucepan
8. Gently heat these ingredients until they come together, stirring all the time, and are slightly thickened (10 to 15 minutes)
9. Allow the caramel to cool slightly before pouring over the shortbread.
10. When cold, melt the chocolate in a bowl over hot water
11. Spread the chocolate over the caramel and allow to cool before cutting into squares

Standard
Baking and stuff, Dutch Apple Cake

Dutch Apple Cake

Disappeared into a frenzy of baking, cooking and pickling this afternoon. I hadn’t done applethat in ages and it felt so good! Two jars of Kimchi made as well as a big pot of Carrot and Ginger soup. A loaf of Brown Bread with Pumpkin Seeds was made to accompany the soup. And for a treat, I made a Dutch Apple Cake.

A while back, I used bake this all the time – served with lashings of creamy, piping hot, custard. We got tired of it so I stopped making it. Going for coffee at a pal’s house the other day, I decided to make it again. It got the thumbs up from both my lovely friend and her husband.

It’s a comparatively slow bake cake – soft on the outside with a crunchy top. While I usually used white sugar on the top, I used brown sugar for a change and it was a very delicious addition.

Why is it called ‘Dutch’ Apple Cake? I have no clue. I think it is the addition of one of my favourite spices, cinnamon.

Ingredients
4 ounces, soft butter
4 ounces, castor sugar
8 ounces, plain flour
2 tsp, baking powder
1-2 tsp, ground cinnamon
½ tsp, vanilla essence
3 ½ fl oz, milk
2 medium eggs
2 large apples (e.g. Pink Lady – if you like a little crunch or Royal Gala if you like a softer apple), cored, peeled and cut into small chunks
2 tbsp, sugar (white or brown)

Method
1. Pre-heat oven to 160C degrees (non fan)
2. Grease a cake tin (10 inch)
3. Sieve flour, ground cinnamon and baking powder together
4. Beat the eggs, milk and vanilla essence together
5. Cream the butter and sugar until pale
6. Add the beaten egg mix in three stages, combining each time
7. Add the dry ingredients in three stages, combining each time
8. Put half the cake mix into the tin
9. Sprinkle the apple pieces on top
10. Cover with the remaining cake mix
11. Sprinkle the sugar over the top*
12. Bake for 40-50 minutes (check with a skewer until it comes away clean)**
13. Turn onto a wire rack to cool (top size up)
14. Serve warm with whipped cream or custard

* I love cinnamon. I used bake the cake without it and when cooled, sprinkle cinnamon sugar on the top
** I place tinfoil loosely over the top at the half way mark to avoid burning.

Standard
Baking and stuff

‘Mr Guinness Cake’

Now referred to by its rather generic name, ‘Porter Cake’, this cake was known as known as Guinness Cake when I was young. I loved the name my mother recorded this recipe under: ‘Mr Guinness Cake’ giving it an elevated status that makes me smile. Another thing which made me smile was the date given: 28 April 1971. My 6th birthday and certainly this was not the cake served at my party! I had mum’s chocolate cake. I always had Mum’s chocolate cake.

When people ask what they should bring from Ireland as gifts abroad, I always recommend a Porter Cake, which is now available in tins, and a bottle of whiskey – of which there are many varieties and standards of excellence.

Ingredients
8 ounces, butter
8 ounces, soft brown sugar
4 large eggs, lightly beaten
10 ounces, plain flour sifted
2 level teaspoons of mixed spice, sifted in with the flour
8 ounces, seedless raisins
4 ounces, sultanas
4 ounces, mixed peel, roughly chopped
4 ounces walnuts, roughly chopped
8-12 tablespoons, Guinness

Method
1. Pre-heat oven to 325 F degrees (160 C)
2. Cream together the butter and sugar until pale
3. Gradually beat in the eggs and mix through
4. Fold in the flour and mixed spice
5. Add the dried fruit and walnuts
6. Mix together well
7. Add in 4 tablespoons Guinness
8. Turn into a prepared 7 inch round cake tin
9. Bake in a moderate oven for 1 hour
10. Reduce heat to 300F degrees (150 C) and bake for another 1½ hours
11. Allow to cool in the tin
12. Remove from the cake tin
13. Prink the base of the cake with a skewer and spoon over the remaining 4-8 tablespoons of Guinness
14. Store for one week before eating

Standard
Baking and stuff

Lime Drizzle Cake

Lemon Drizzle Cake is a firm favourite in this house but I still love to experiment! That led to the arrival of Orange Drizzle Cake* and this week, Lime Drizzle Cake. It was such a nice change and reallyScreenshot_20181212-195830_Chrome was delicious. Most of all, we loved the extra tang of the lime juice.

Ingredients
8 oz, castor sugar
8 oz, unsalted butter
4 eggs, beaten
8 oz, self-raising flour** – sifted
Rind of two limes, finely grated
6 tbsp, lime juice
3 1/2 oz, icing sugar – sifted

Method
1. Pre-heat the oven to 180C (fan)
2. Line a loaf tin with greaseproof paper
3. Cream the sugar and butter until pale
4. Add the beaten egg in 4 stages, combining each time
5. Add in the flour in stages, combining each time
6. Add the finely grated rind and two tablespoons of lime juice
7. Bake for 50-60 minutes in the centre of the oven (loosely cover with tinfoil mid-way through the baking to avoid burning). The cake is baked when a skewer inserted into the centre comes out clean
8. In a saucepan, gently heat the icing sugar with the remaining lime juice until it is syrupy
9. Prod the hot cake with a skewer all over and carefully pour the warm syrup all over
10. Leave to cool in the tin
11. Serve simply with a mug of coffee or with whipped cream and fresh raspberries

*The reciple for the Orange Drizzle Cake can be accessed here: https://teeninattic.com/2013/12/11/necessity-is-indeed-the-mother-of-invention/

** I had no self-raising flour so I used 8 ounces of plain flour and added three teaspoons of baking powder. Worked like a dream!

Standard
Baking and stuff

Last minute Christmas Cake

I’ve always been a fan of Jack Monroe – the person and the cook. When I saw this recipe, I couldn’t wait to try it. It’s a last minute Christmas cake which has only *four* ingredients – mincemeat, eggs, flour and sparkling ginger ale/beer.

I made a couple of adjustments, however – to match the contents of my cupboard, to compliment the mincemeat I had and to take on board the suggestions they make at the end of their recipe.

As the mincemeat already contained rum, I used sparkling water and added half a teaspoon each of ground ginger and ground cinamon. I also added in the finely grated rind of one lemon and the juice of half that lemon. It’s a very wet mix so I was worried it might not turn out. But it did and it was lovely. My kitchen smelt all Christmasy when it was baking. Divine!

Here’s the link, if you feel like trying it out: https://cookingonabootstrap.com/2018/11/19/easy-christmas-cake-recipe/


Standard
Baking and stuff, Banana Bread

Banana Bread

banana bread

I have baked so many loaves of this Banana Bread that I’ve lost count. I never like dumping very ripe bananas so this is my fail safe recipe to use them all up. A popular treat for my teen, it was also a big hit with the two teens that once lived next door. Their mother remarked that it was the only way one of them would eat fruit!

Like all loaf cakes, it is meant to taste nicer the next day. I am unsure if this is indeed true as I have never known it to last that long!

Ingredients
1lb over ripe bananas, mashed
7 ounces, self-raising flour
¼ level teaspoon, bicarbonate of soda
Pinch salt
6 ounces, castor sugar
3 ounces, unsalted butter softened
2 medium eggs
Sunflower oil

Method
1. Heat the oven to 180 C degrees
2. Line a loaf tin with baking parchment and brush with sunflower oil
3. Sieve the flour, bicarbonate of soda and salt together
4. Mash the bananas
5. Cream the sugar and butter together until pale
6. Beat the eggs
7. Add the eggs to the sugar and butter mix in three stages, mixing well each time until combined
8. Add the bananas and combine thoroughly
9. Add the dry ingredients in three stages, combining well each time
10. Turn the mix into a loaf tin and bake in the oven for about 30 minutes
11. Cover in tinfoil and bake for a further 35-40 minutes
12. Test with a skewer to see that it is baked throughout
13. When done, turn onto a wire rack to cool

*There is a vegan version in the ‘Vegetarian and Vegan’ section.

Standard
Baking and stuff, Flapjacks

Yeah! Flapjacks!

photo 2 (3)


I’ve been very lax recently. While home cooking continued on course, the time to photograph, write up and record was in short supply. Tonight, I accomplished all three and feel pretty proud of myself!

Flapjacks remind me of being in the Girl Guides. I’m not sure why as I never remember making them then. As my sojourn into the Guides was short-lived, it is little wonder my memory is so scratchy! I know I didn’t get a badge for baking them because that was earned for baking brown bread. Hard as a rock because there was a misprint in the recipe, which called for ‘milk’ and not ‘buttermilk’, the Brigade Leader awarded me the badge – begrudgingly.

The Guides was not for me. I liked the fun but balked at the regimentation, the tasks, the awful leather belt, cycling through cold nights to get there and the uniform. I hated my school uniform so it is still amiss to why I raced home to change from one uniform into another to attend the Guides. Why did I leave? Truth be told, I didn’t really leave – I ran away. The word ‘camping’ was mentioned and that was me gone. I have never slept in a tent and never intend to. I like my creature comforts too much – crisp bed linen, heating, hot water and now that I am that bit older, a well stocked mini-bar! Did I enjoy any thing about the my time in the Guides? Sporting my one and only badge could probably be the sum total of it had I stayed long enough to sew it on! And an odd memory of Flapjacks.

Flapjacks do odd things to our senses. Why is it that when we throw oatmeal into the mix, we kid ourselves it’s healthy? Flapjacks may contain oatmeal but listen closely to the other ingredients and you can hear your arteries harden! Nevertheless, they are still delicious and I can fool myself when looking at them that they are health bars or fashionable energy bars. I used organic oatmeal tonight – not because I was trying to imbibe any extra fibre into these gorgeous baked babies but because it was all I had in the cupboard. I also added sultanas – not for their vitamin content but because they were sitting next to the oatmeal and add an extra dimension of chewiness!

Flapjacks is my favourite traybake but so many get them wrong. They have to be gooey and chewy to be worthy of the name. My all-time favourite is sold in Courtney’s Bakery in Dingle, County Kerry. Chewy and sweet with the corners dipped in chocolate. Perfection!

Flapjacks

Ingredients
4 1/2 ounces butter
4 1/2 ounces brown sugar
9 ounces oatmeal
3 tablespoons golden syrup
Pinch of salt
2 ounces of sultanas (optional)


Method
1. Pre-heat the oven to 180C
2. Grease a baking tin and line with baking parchment (I use one which is 20cm x 20cm)
3. Place all the dry ingredients in a bowl
4. Melt the butter
5. When melted, add the butter and golden syrup to the dry ingredients, mixing until all are combined
6. Turn into the baking tray – press into the corners and flatten down so that the mixture will bake evenly
7. Bake for about 20 minutes or until golden brown
8. Let cool in the tin and when ready, cut into 9 generous or 12 small squares.

Standard
Baking and stuff, Chocolate Fudge Cake

The “famous chocolate cake”…?

Christmas and the decision of what to bring to the yuletide table reared its head once again. Thankfully, the decision was already made when my cousin told me to bring my “famous chocolate cake”. I burst into laughter – never heard such silliness. I mentioned it to one of my neighbours and he remarked “I’ve heard that cake is the stuff of legends.”

 As someone to whom the magic of chocolate is completely lost, I was stunned by this reaction. It’s always been the Teen’s favourite cake but I thought that was simply due to the high concentration of chocolate. It’s a bit of a tricky one to make but obviously worth the effort judging by the feedback I’m getting!


Ingredients
Cake
4 ounces unsalted butter
7 ounces castor sugar
6 large eggs
2 teaspoons vanilla essence
4 ounces plain flour
2 ounces cocoa powder
1 teaspoon baking powder
Pinch of salt

Method
1. Pre-heat the oven to 180C
2. Prepare two circular cake tins with grease proof paper
3. Melt the butter in a small saucepan and leave aside to cool
4. Sift the flour, cocoa powder, baking powder and salt together three times and leave aside
5. Place the eggs and sugar in a bowl and beat with an electric whisk until light cream in colour and ripples can be left in the mixture
6. Mix in the vanilla essence
7. In three stages, fold in the dry ingredients until mixed completely
8. Add in the butter and blend thoroughly
9. Divide this batter into the two tins and bake for 20-25 minutes in the oven
10. The cake is done when tested with a skewer which comes out clean and the cake is coming away from the sides of the tin
11. Remove the cakes from the tins and leave to cool on a baking rack

Icing
4 ounces icing sugar, sifted
2 ounces soft unsalted butter
1 ounce drinking chocolate powder
2 tablespoons milk

Method
1. Blend all of these together
2. Spread on one side of the cake and sandwich together

Frosting
8 ounces icing sugar, sifted
2 ounces unsalted butter
3 1/2 ounces dark chocolate (75% or over)
3 tablespoons milk
1 teaspoon vanilla essence

Method
1. Break the chocolate into pieces
2. Place all the ingredients over a low heat and allow to melt
3. When melting, keep stirring to insure all ingredients are mixed together
4. When melted, remove from the heat and keep stirring until the mixture cools and thickens*
5. When the mixture has thickened and is glossy, gently spread over the sides and top of the cake (I use a flat cake knife and do the edge first and then the top)

*If you leave the icing to cool without stirring, it will become unusable

So there you have it. Chocolate, chocolate and more chocolate. A nice cake or the stuff of legends? That, my dearies, is up to you to decide!


Standard
Baking and stuff, Chocolate Sponge Cake, Family Stories and Food, Mum and Baking

Mum’s rare chocolate cake

Mum was a brilliant baker – for others but not for us. For charity, for church, she would bake, bake, bake but on the home front, she always limited confectionary. There was no philosophy to it – she simply didn’t lavish us with sweet treats. Pals reminisce about how fascinated they were to always find biscuits in our house when they’d be scoffed within minutes of leaving the shopping trolley in their homes.

We did get treats some Sundays – a couple of chocolate biscuits and a glass of cold milk. Jelly and long life cream. Tinned fruit salad and…eh…long life cream. A sliver of HB Vanilla ice-cream served between two wafers or covered with broken Flake chocolate. Angel Delight. And a dessert I have never encountered anywhere else – never, ever – whipped jelly (long life cream optional). Dad was a little more in tune with the sweet tooth needs of youngsters, sneaking in the odd Kit Kat or bar of chocolate, neatly tucking the contraband into the creases of the Evening Press newspaper.

In the run up to Christmas, Mum would religiously slave over a cake and puddings, intoxicating the fruit with oodles of alcohol taken from a generously (over)stocked drinks cabinet. Then she would get annoyed when no one ate any – that included herself! One time it all got too much for her. She threw down her wooden spoon in a fit of rage, refusing to be a slave to tradition and so no cake or puds were prepared that year as she continued her one-woman-protest. Her sense of victory was immense but short lived. Picture the poor woman’s face when she received not one, but seven, Christmas cakes as gifts. We sat with the hoard of iced blocks adorned with snowmen and plumb Santas in the middle of the table – looking at them aghast. Mum hated waste and we feared we might be forcibly fed the whole lot. Re-gifting was the only sensible way to go.

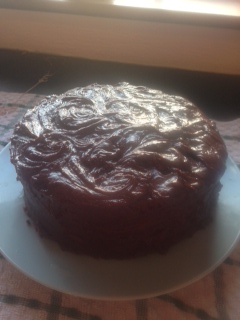
On her all too rare moments of madness, she would make chocolate cake. Light and delicate, we would savour each rationed piece. I would marvel at the criss-cross pattern on the top. In later years, I learnt there was no great mystery to this but merely the result of cooling sponges on a wire rack!

The Teen likes this cake too but only as a mildly acceptable alternative to my own recipe (which teeters on the verge of being throttled to death by chocolate!). For her, it is an option but never a substitute. Not being a mad fan of chocolate, I prefer this lighter version. It is all a question of taste.

When the Teen was a tot she was horrified at my dislike for all things chocolate. At the tender age of three, she proclaimed that ‘Real mummies like chocolate, drink tea, wear skirts and walking shoes.’ As I complied with none of these conditions at the time, I failed to make the ‘Really Mummy’ grade! Thankfully, the tiny tot wasn’t as disappointed with the cake.


Mum’s Chocolate Cake

Ingredients
For the sponge
8 ounces self-raising flour
10 ounces margarine
8 ounces castor sugar
4 large eggs
4 level tablespoons of powdered drinking chocolate
2 tablespoons of milk

For the filling
4 ounces butter
8 ounces icing sugar
Few drops of vanilla essence
1 tablespoon of milk
1½ tablespoons of powdered drinking chocolate

Method
1. Preheat the oven at 175 C
2. Combine flour, margarine, castor sugar, eggs, drinking chocolate and milk in a bowl and beat well for two minutes with a cake mixer
3. Put into two greased and floured 8 inch tins
4. Bake in the oven for 35 minutes
5. Turn out on a wire rack to cool
6. To make the filling – cream together the butter, 8 oz icing sugar and powdered drinking chocolate
7. Add the vanilla essence and milk until blended
8. When the sponges are cold, spread the icing on one side and sandwich the two together
9. Lightly dust the top with icing sugar.


Standard